![]()
Unless you start with a pile of tubing, all-new parts and a beautiful mind, your average garage-built motorcycle comes together one piece at a time—and it’s not all glamorous. We’re zeroing in on our vision of a functional hoonmobile, but our Honda CB550F Tracker has some loose ends to address in form and function before it finds its stride.
Today’s program is essentially five minutes of fame for the nitty-gritty work we generally overlook in the final product. Tedious, but essential in our revival, our work in this segment includes squaring away our problematic front fender, finalizing the fit of our aftermarket seat, some detabbing and replacing our wheel bearings with basic tools.
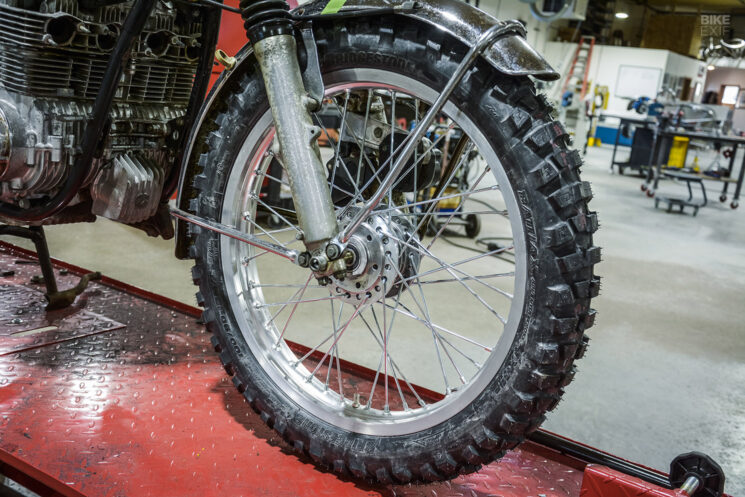
Solving the Fender Dilemma If you’ve been following along with our CB550F Tracker project, you know the front fender was the single biggest issue I had with the way this bike was progressing. Our stock tin fender was pitted and dented, and the radius did not play well with our larger Bridgestone Battlax AX41 rubber.
That said, we needed some sort of fender, not only for functionality to appease the comments section, but also because the bike needed some visual weight out front. We mocked up several different tin units, plastic dirt bike fenders and even played around with the idea of a fork brace before we committed to modifying our beat-up stocker.
I started with some tape lines to visualize my cuts, and I cut both ends off the fender so I could weld them back on to preserve the wired edge. I assure you, this makes all the difference in the final product, as the raw cut edge just won’t cut it up close.
After fitting and refitting our pieces, we made the fender whole again with our TIG welder on low amps and welded it inside and out. I dressed it with various abrasive tools, used a hammer and dolly to perfect the shape and finished it off with a blending wheel on an angle grinder. While the chrome on the fender is still pretty hit, and you can see the worked area up close, the front end of our CB finally looks right to my eye.
![]()
Fitting a Universal Aftermarket Seat The right seat can make or break your build, and unless you’re crafting it from scratch, you’ll have nothing more than a few photos and measurements to base your purchase on. We partnered with Tuffside for our build, and Chris sent over one of his Universal Street Tracker seats with our desired upholstery and mounting locations for our bike.
We could have made things easy on ourselves, as Tuffside offers a direct-fit version of this seat for the CB550. But since there are very few direct-fit seats on the market for these old bikes, and we don’t fear the cutoff wheel, we opted for the universal option—which comes in at a sporty 26-inch length.
There are plenty of ways to make a seat fit, and you can go as far as building a whole new rear hoop if you like, but in the everyman spirit of our CB550, we decided to take a simple and pragmatic approach. I’ve mocked the seat several times and addressed the conflict areas as they arose, starting with the stock seat’s hinges, and moving on to other tabs, helmet holders, etc. At that point, the seat fit loosely on the bike, but the frame needed further modifications to tighten up the fit.
The CB’s stock seat support was preventing our Tuffside seat from fitting tight against the frame, and we would have been well within our rights to trash the bracket altogether, but I opted to rework it instead. I cut the support off where it met the frame, and bolted it to our Tracker seat to determine how much further forward it needed to be.
With that location determined, I added some material to the front of the seat support so it matched the angle of the tail on our Tracker seat and burned it in. Sure, you could make a trick new piece from scratch that looks better, but other than on your Instagram account, it won’t be seen.
The other conflict area I ran into was up front, where a stock gusset/mounting location was preventing the seat from fitting tightly against the fuel tank. I had to trim a significant amount of the gusset off to get it perfect, so I made a new gusset on the bottom side to add strength and give the seat tab some more meat to grab on.
![]()
All said and done, the seat mounts with nothing more than the front tab and two bolts through stock holes on the CB’s seat support bracket, which are concealed by the upholstery. Finally able to climb into the saddle, we found the feel of our new Street Tracker seat to be excellent, practically OE quality. There’s no give or shifting from poor fitment, and the bottom of the seat perfectly follows the line set by the fuel tank.
![]()
Trimming Tabs Detabbing a frame is an essential part of any custom bike, as nothing distracts from your new cosmetics quite like a hastily welded tab for a passenger peg from the 1970s. That’s the exact piece that was the biggest eyesore on our frame, as the tab was massive, unnecessary and cluttered the swingarm area on our tracker.
![]()
There’s no need to overcomplicate this procedure, but plenty of cause to be safe about it. You want to avoid cutting or grinding into your frame tubes like the plague, as the final result will be an unsightly gouge you’ll have to fill.
Start with a cutoff wheel to remove the tab completely, but leave the weld area on the frame. From there, move on to a grinding disc or flap wheel to take off the weld, but keep your disc focused on the weld itself, and save the blending for the end.
![]()
If you have the means, a tube sander will get you the best finish possible without gacking your frame, and we finished ours with a cheap version and a well-used 80-grit belt. There are still other tabs on our Honda CB550F Tracker that need to go, but I’ve been removing them only as needed, since some may be reused.
![]()
Replacing Wheel Bearings With Basic Tools Call it an irrational fear, but the thought of original wheel bearings failing used to always linger in my mind while in the saddle of a recently revived motorcycle. Thankfully, that never happened, but there’s no reason to ride on OG rollers if your bike is anything like our Honda. We have a 20-ton press and fancy bearing pullers around the shop, but for the sake of principle, I vowed to make this happen with average hand tools.
We grabbed a budget sealed-bearing and seal kit from 4INTO1 for $27 to get started, containing everything we needed front and rear. On our Honda, both wheels have the bearings pressed in with a spacer in the middle and a thread-in retainer on one side.
Starting with the front wheel on the retainer side, you’ll find a series of peens, or stakes, that keep the retainer from unthreading. Using a ⅛-inch drill bit, drill slightly into the stakes to clear them, and heat the hub for several minutes with a heat gun. While there are quicker ways to heat and expand the hub, heat guns are readily accessible, and are a safer option for any surface treatments on your parts.
With the hub hot, I’ll use a punch to get the retainer spinning, and a pair of pliers to take it the rest of the way. After that, we’ll flip the wheel over on the bench and start heating the opposite bearing. Once it’s hot, we flip back to the retainer side and use a punch to shift the center spacer to one side so we can hit the bearing’s inner race to drive it out. If you’ve used sufficient heat, the bearing won’t take much convincing.
It’s the same process for the retainer side, except that we can remove the center spacer completely to get it out of the way. Some hubs may have notches in the bearing seat around the outer race that you can get a punch on, but our Honda did not.
Removal of the rear bearings is done in the same fashion, but our CB550’s rear put up more of a fight. The tabs that hold the center spacer in position were stronger, and it took more force to get the spacer shifted over. Also, the retainer-side bearing has a metal bushing in it that you’ll have to work around, and the retainer itself is a bit harder to remove. I used a tool we welded up years ago, but you can also tap two of the holes to accept an M6 bolt and use a pry bar to spin the retainer out.
![]()
If you’ve made it this far, installing the new bearings is easy. Our only words of caution are to ensure you have the tabs on your center spacers bent just right, and to be aware that some bearings don’t have a seat and can be driven too far into the wheel. Also, it takes some doing to get your new bearings installed by hand. A press would simplify this greatly, but a liberal application of heat and some taps with a brass drift on the outer bearing race will get you there.
![]()
Unsolicited Final Thoughts To most, I’m sure our CB550 Tracker looks the same as it did at the end of our mockup phase in Part 3, but I can assure you this is a completely different motorcycle. The wheels are new from the inside out, the suspension works now (better than new) and we’re honing in on the final vision of our go-anywhere hoonmobile.
That’s what this bike is all about for us, proving what anyone can do with a little know-how, some basic tools and a cheap old motorcycle. It all starts with the big pieces and ends when you’ve chiseled away everything that isn’t David.
![]()
Bike EXIF thanks Motogadget, Tuffside, Bridgestone, Lowbrow Customs and Biltwell Inc. for supporting our Honda CB550F tracker build.