
I’ll be honest, rebuilding the wheels on our 1975 Honda CB550F was a job I was hoping to put off a lot longer. The process of lacing and truing wheels is tedious, and there are plenty of opportunities to scratch a fresh rim when you pull the tire irons out. Considering a shoestring budget is the cornerstone of our everyman CB550 tracker build, and our stock wheels are completely roached, I’ll be DIYing this whole process for your education and commentary. Buckle up, because we have some serious ground to cover.

In Part 3 of our Honda CB550 tracker build, we started getting some of our major visual modifications mocked up, but there was no seeing past our trashed wheels. Additionally, we really needed our gnarly Bridgestone BATTLAX AX41 tires mounted to visualize the rest of the project

We’re only salvaging the stock hubs, so we ordered a basic wheel rebuild kit with aluminum rims and zinc-plated spokes and nipples for right around $170. That means the only disassembly involved is taking an angle grinder to the original spokes to liberate the hubs. I used a brass wire wheel on an air tool to remove the corrosion and the old Honda clear coat, and buffed the hubs to a mediocre finish with a polishing wheel.

Lacing Motorcycle Wheels I haven’t built enough wheels to consider myself pro, or even advanced for that matter, but it’s not all that complicated if you take your time and do your homework. Before you cut up your old wheels, take a few measurements to determine if the hubs are offset to one side, and a couple of photos will help establish reference points for lacing spokes.

Lacing our Honda CB550F wheels starts with our inner spokes (the spokes with less than a 90-degree bend) and the valve stem hole as our starting point. We identified its corresponding hole in the hub before we started, but there’s plenty of info on the web if you’re starting from scratch. Using our front wheel as an example, you can see the bench rule forms a tangent line from our first hole in the rim to its hole in the hub.
From there, note the pattern of holes in the hub and rim (skip one hole in the hub and three in the rim for our front wheel), and the inner spokes fall into place. Thread each nipple on just a few turns to keep everything loose, and you’ll want to use some sort of lube on the spoke threads so they tighten up consistently without galling.

Next, we flipped the wheel and used the same pattern for the inner spokes on the other side, but lacing in the opposite direction so the inner spokes cross each other. With inner spokes done, the outer spokes are installed from the opposite side of the hub and you’ll be able to tell right where they go. Our outer spokes lace the opposite direction of the inners, and the spokes cross three times on our front wheel, and two times on the rear wheel.

Truing Motorcycle Wheels We have both wheels loosely assembled at this point, and it’s time to make them tight and true. A truing stand simplifies this process a great deal, and ours is nothing more than a budget unit from Harbor Freight. It gets the job done, but (hilariously) does not come with a pointer, so we’ll use a dial indicator on a magnetic base without being too picky about the actual measured values. If you’re really balling on a budget, you can true your wheels on the bike using your axle as a fixture and a cable tie or some other piece of scrap as a pointer.
With your wheel in the fixture of your choosing, it’s time to start tightening up the nipples, but take it slow. Running the nipples down slowly and EVENLY will make the real business of truing the wheel a lot easier, and the wheel will start to take shape when you’re down to the last couple of threads.

As the spokes start seating in the rim, we can break out our pointer and start fine-tuning the wheel. I like to start with wheel hop, or up and down variance, to ensure we’re not too far out of whack right off the bat. Tighten a series of inner and outer spokes to bring the rim up (closer to the hub), and you may need to loosen some on the opposite side to get things into shape. Addressing runout, or side-to-side variance, is done in a similar fashion, except you’ll tighten or loosen spokes on one side of the wheel to shift it right or left.
I went back and forth with our CB550 wheels, checking the hop and runout, and making small adjustments of a quarter turn at a time. It’s helpful to make some reference marks with tape to help you keep track of your problem areas. The bigger the section that’s out of whack, the more spokes you’ll have to adjust, but you’re always working multiple spokes to correct a section.

Once the wheel is straightened out (and any hub offset accounted for), you want to make sure your spokes are tight, but not too tight—as you’ll gall up the threads on the spoke if you go too far. There’s a specified torque for your spokes, but unless you have an adaptor and an inch-pound wrench, you’ll probably use the audible torque spec method. Knock an 8 mm wrench against each spoke and listen for a nice ‘ping’ sound. A loose spoke will give a dull tone.
Perfection is the enemy of the good, as I spent way too much time straightening out our cheapo aluminum hoops. You’ll always have a hiccup in your measurements at the seam where the wheel is welded together, and remember to dress any spokes protruding through the nipples before installing your rim strips.

Mounting Motorcycle Tires We’ve come a long way to get our CB on some new rubber, and if you’re still with me, I promise I’ll keep this brief to get us over the finish line. We’ve been teasing that we have some gnarly meats for our tracker project from the get-go, and it’s finally time to install our new BATTLAX ADVENTURECROSS AX41 tires from our friends at Bridgestone. They’re beefy and rad enough to ruffle some feathers, but we also appreciated the mix of DOT street and off-road performance the tire offers, and we were stoked to find sizing options that would work on our old CB550F.
If you ride motorcycles, you’ve probably changed a tire (or at least understand the process), so I won’t beat this one into the ground. Line up the balancing mark on your tire (if it has one) with your valve stem and work the first bead over. Soapy water and baby powder are your friends here. Then install the tube and work your second bead on with your trusty tire irons, making sure not to pinch the tube in the process.

We mounted our front tire by the book, but I did it a second time to show a trick using cable ties (because I obviously wouldn’t mount the tire backward and have to redo it). With this hack, you install the tube into the tire and then use several cable ties to squish both beads together. Essentially, you only have to work the bead over the rim once with this approach, before cutting and pulling the cable ties.

Postscript Finishing that project, and condensing it for this site, requires a deep breath and a cold drink. It’s not all that difficult if you’re headstrong and handy, and certainly worth it if you can take pride in a couple simple pieces of aluminum like I can. For the small size of our investment, the transformation is huge, even though I still need to redo the brakes and polish a few more pieces.

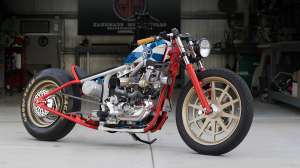
With our new wheels and tires on the bike, I can finally see everything coming together and fine-tune the visual weight of our Honda CB tracker. It’s PLAINLY obvious the front fender doesn’t work as is, and I’ll do some mock-ups with the fender shortened, raised to the lower tree and removed completely, but we’ll save that for another day.
Even with a modern tread design, I’m stoked on the tires. The bike looks timeless and rugged with a little early ’60s dirt bike influence, and I can’t wait to hoon this thing around when it’s finished—that's what it's all about right? I could ramble on, but there’s work to do. Time to tidy up our frame more and install some suspension to match those meats. Stay tuned.

Bike EXIF thanks Motogadget, Tuffside, Bridgestone, Lowbrow Customs and Biltwell Inc. for supporting our Honda CB550F tracker build.


Comments