
I once shot a billboard for Ducati with a penlight—and I was paid with a Hypermotard.
That got your attention didn’t it? Being a photographer is a lot like being a magician. Sometimes the best tricks are the simple ones, just done extremely well. Today I’m going to show you one of my motorcycle photography tricks—a trick that enables you to get professional-looking shots of your bike without the cost of a commercial studio or even a lighting rig.
It’s called light painting. Now, those of you with a modicum of photographic knowledge might know this technique—and like HDR, how horribly it’s sometimes abused. But if you do it well, it works brilliantly.The trick is to make sure that the technique is not apparent. If you look at a photo and can see instantly how it was shot, then the image is more about the technique and than the subject. And we don’t want that, because we all know that motorcycles are the coolest things in the world.
So here’s how to shoot your bike on the cheap, using your smarts rather than your wallet.

The image above was shot in my living room using light painting. That means a long exposure, generally more than a few seconds and but less than a minute or two. Your room or garage needs to be dark, so the best time to do this is at dusk, or in a room with a light switch and shades.
You’ll need a tripod, because you can’t handhold a long exposure. And then you need a light source. This is where it gets fun, because you can use almost anything.
You know those great studio shots of supercars, with the epic long reflections? They were done in a huge studio with gear costing hundreds of thousand of dollars and a ‘soft box’—a giant panel of light with many strobes shining through a diffusing fabric, probably three times the size of the car or bike.
Normally, you’d need a soft box about 20-30’ long to get the same effect. And motorcycle photography is harder than car photography: Bikes have more complicated surfaces, which makes them difficult to light. You almost need to have a light that can wrap itself around the bike.
See where I’m going here? With light painting we can cheat the system and get a better result.
Here’s the process, in simple steps. Get a flashlight or two, something like a Surefire G2 (below). Darken the room, position your subject, and put your digital camera on a tripod. Read the Motorcycle Photography 101 article to figure out what lens to use and what angles to shoot.
Stop down the lens. On your camera, close down the lens aperture—increasing the f value—until you get a long exposure time. You may need to juggle your ISO settings, but try not to go over 400 with them or the image will start to get grainy. I’d suggest an exposure of around a minute. It’s long enough to get a lot done, and not so long that you get bored.
Hit the shutter button to start the exposure and then, with your body shielding your flashlight from the camera, walk up to the bike and start shining the light onto it. You’re ‘painting’ the surfaces with light. If the light points towards the camera you’ll get all the streaks that are the hallmark of light painting but for our shot we’re not going for the gimmick—we’re going for great light.
Sometimes I’ve wrapped my light in a black t-shirt or made a little black funnel to stop stray light from shining towards the camera, and to direct it onto the bike.
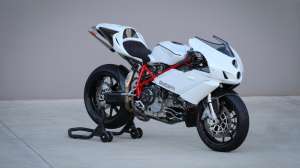
Get dark fabric and white card. For the shot above, I was in my living room because there was no way to get the bike down the stairs into my studio. So I hung a 12’ piece of seamless black cloth behind the bike, and taped over all the windows to black out the room.
Look at the shot below and you’ll see that we also put down a large white card to create a continuous highlight on the Ducati SportClassic’s exhaust.

Hook up your laptop. You’ll need a digital camera so you can evaluate your exposure and technique on the spot. I always shoot ‘tethered,’ with my camera connected to a computer via a USB or Firewire cable so I can see the results show up large on screen. (I cannot for the life of me understand why you wouldn’t do this if you can: I want to know exactly what’s happening with the camera. Down to the last pixel.) If you don’t have the capability you can still use your camera’s LCD to see how you’re doing.

Focus on what is important. The closer you get to the bike with your light source, the brighter the light will be and the harder the shadow. Move back, and the light will be softer and darker. So think what’s important on the bike, and move your light closer to those areas. It’s probably the tank, the cylinders, the headlight and of course the wheels. So spend a bit more time ‘washing’ those with light.
Don’t light up areas like the battery, the mirrors and the wiring. Use this technique to highlight the things you love and obscure the unimportant.

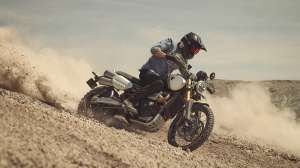
In the shot above, I put my flashlight in a small soft box to give an even softer light. (Ignore the flares above the bike, we can remove them later.) Notice how the sweeps of light are making a nice, smooth reflection on the hard-edged surfaces of the Ducati Hypermotard, which is a notoriously difficult motorcycle to light. You’ll get an even better effect on the simpler curves of an old BMW or Honda CB.
You won’t get the perfect shot the first time, but by checking your results, you’ll quickly see what is working and what isn’t. It’s not as hard as it sounds and it’s good exercise too, with all the running back and forth and dancing around with your penlight.
Overlay your shots. Because you’re using a tripod and you haven’t accidentally bumped it or moved it, you can also mix and match shots. So you might use a big painting motion for the overall body of the bike, and then do another shot for the engine, painting it with a smaller flashlight. Later, you can combine the best of both shots.The technique that works in my living room will also work in your garage or workshop, or even in your driveway on a dark night. Any place without bright streetlights is a potential makeshift studio.
Mixing shots and blending multiple exposures usually requires computer work, using a program such as Photoshop. If you don’t have photo-editing software, you may be able to do it ‘in camera,’ and just keep working on it until overlaid shots look right.
Note: If there’s a misconception about pro photographers, it’s that we get it right first time through sheer genius. In real life, we keep at it until we get it right. Then we try to convince you we got it the first time.Photoshop technique. I’ve never shared this with anyone before, but since you are my kind of people—fellow motorcycle devotees—it only seems right.
The Hypermotard and SportClassic shots were part of a larger image—the spectacular line-up of blood red Ducatis with a menacing look. I knew ahead of time what I was looking for, so I shot from just above axle height and used a slightly wider-angle lens than normal. (A 45mm Tilt/Shift lens.)

A few weeks later, I took delivery of my own new Ducati Hypermotard, a bike that I adored—right up until the day it was stolen.
Ah, well. You win some and you lose some.
Check out more examples of Gregor Halenda's work on his website at gregorhalenda.com.
Comments